Those of you who read my blog article on the Orion nebula last week may be wondering why there is such a difference in quality between the two images I took below. They were both taken using the very same telescope, at the same magnification, using exactly the same camera and camera settings, and under the same observing weather and lighting conditions. The first image below is so much clearer than the second due to three main reasons - the eyepiece, a filter and tracking.
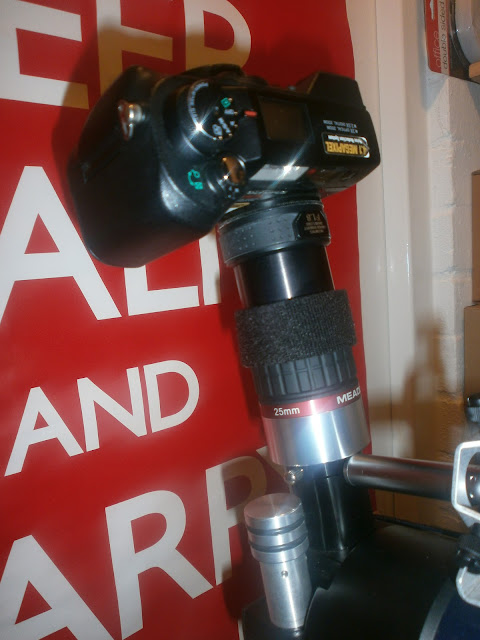
 Both photographs were taken using a technique that is known as afocal photography. This involves attaching your camera to a telescope eyepiece, using what's called a camera T-adapter and a T-ring. You need a T-adapter for your make of camera (in my case, this is an Olympus Camedia C-4040Z digital camera), which you screw into the lens thread of your camera. You then attach a T-Ring to the adapter and this allows a telescope eyepiece to be attached to it. This assembly is then mounted into the eyepiece holder of your telescope, as in the picture to the left. So instead of your eyes looking through the telescope eyepiece, it's the camera that is looking through it. You would then focus your camera to infinity, focus the telescope until you get a sharp image and then you're ready to start shooting.
The first big difference between the two images I took of Orion is down to the 25mm telescope eyepiece I used. The poorer image was taken with the Meade Series 4000 25mm Super Plössl eyepiece that is provided as standard with my Meade ETX-80 telescope. Now, there's absolutely nothing wrong with the Series 4000. But using a higher quality eyepiece will really make a world of a difference with your views - even with a small aperture scope like the my ETX-80, So for the first image above, I used Meade's Series 5000 25mm eyepiece. This is a high-quality eyepiece with a wide 60° apparent field-of-view, premium grade optical glass with multi-layered coatings for maximum light transmission and all its internal metal surfaces blackened to maximize image contrast. The difference in quality is reflected in its price as well - a standard Meade 25mm eyepiece costs about £20, the Series 5000 is closer to £90.
The other element I added to the mix was a nebula filter. Nebula filters are attached at the end of your eyepeice and they significantly reduce light pollution by blocking out light that is emitted at the wavelengths of articifical lighting from housing, buildings and street lights. Light from emission nebulae and planetary nebulae have a different wavelength of light than streetlights and the light of a nebula passes right through the filter. So the nebula filter blocks out the sky glow to add contrast, making emission and planetary nebula more visible.
A word of warning though - nebula filters are great for nebulas, but not stars, star clusters, planets or galaxies. These objects emit light from all wavelengths including the same wavelengths as street lights which the filter blocks - so a nebula filter would diminish the view of such objects and actually make things worse!
And, finally, the last step in producing a good sharp image is tracking. You might not realize it while looking at the stars with your naked eye, but stars are constantly moving across the sky. This is because of the Earth's rotation along its North-South axis, which makes relatively stationary stars in the night sky appear to move slowly in a circular fashion. So it's not so much the stars moving - it's you who's moving! This movement can be clearly seen if you have a magnified look at a star with a fixed telescope - the star will appear to travel slowly across your field of view in the eyepiece.The poorer image above was produced using very little tracking, so as the stars moved, the trail of light left by its movement is captured on the image. However, in the second image, I used my telescope's computerised tracking function, which makes small adjustments to the telescope's altitude and azimuth settings so that it moves in harmony with the sideral motion of the stars. You can read all about sideral motion at another blog article I wrote.
All photographs on this page © Sabri Zain 2012.


No comments:
Post a Comment